A loose attic hatch can be easy to overlook: it may be used only a few times a year, yet sit above a hallway or closet where warm indoor air can leak into the attic. Sealing that opening is a manageable home-improvement project for many homeowners, but it takes more than sticking insulation to a panel. The hatch must still open safely, and the work must not interfere with attic ventilation or heat-producing equipment.
The U.S. Department of Energy recommends air-sealing a home’s larger gaps before adding insulation. An attic access opening is a useful place to check because it connects conditioned living space to an often-unconditioned attic. A well-fitted hatch can help limit drafts and unwanted air movement; how much difference it makes depends on the home, climate and other leaks.
Start with an inspection
On a dry day, look at the hatch from inside the home. Check whether it sits flat, whether its edges have visible gaps, and whether the frame or surrounding trim is cracked or loose. A strip of tissue held near the closed hatch may flutter if air is moving, though a still tissue does not prove the opening is airtight. Avoid using a candle or other open flame to look for drafts.
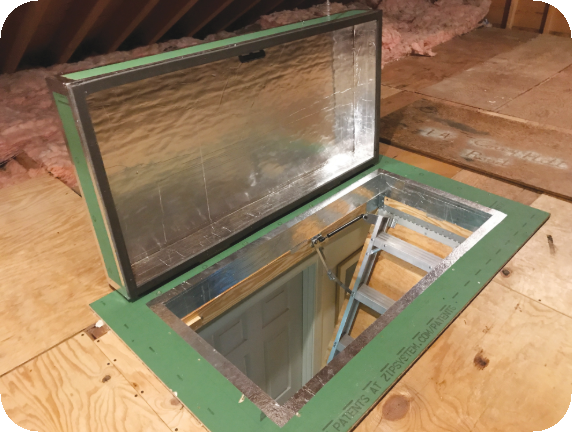
If the access is a simple panel, note its dimensions and how it rests on the frame. If it is a pull-down stair, inspect the perimeter of the stair frame and the closed door. A stair assembly needs to open and close freely; do not attach a bulky cover in a way that jams its hinges, latch or moving parts.
Also look at what is nearby in the attic. Stop and seek professional advice if the hatch opens near a chimney, flue, furnace, water heater, exposed wiring or other heat-producing equipment. Insulation and air-sealing materials have specific clearance and installation requirements. Do not cover ventilation openings, electrical equipment or anything that needs access for inspection and maintenance.
Seal the moving edge with weatherstripping
For a straightforward hatch, weatherstripping on the frame can create a compressible seal when the panel closes. Choose a product intended for doors or windows and suited to the size of the gap. The aim is even contact around the perimeter—not so much material that the hatch will not close or the panel bows.
Clean the surface before installation and follow the product instructions. Apply the strips continuously around the frame where the hatch meets it, taking care at corners. Close the panel gently and check that the seal compresses along all sides. Open and close the hatch several times. If it catches, will not latch, or leaves a large uneven gap, adjust the fit rather than forcing it shut.
Caulk is generally better for stationary cracks around the frame than for the edge of a panel that must move. A homeowner may be able to seal small, accessible cracks between fixed trim and drywall with an appropriate caulk. Larger gaps may need a different material or repair; expanding foam can spread beyond the gap and make a mess or obstruct moving parts. Follow product labels, and do not use foam near hot surfaces or where it could interfere with wiring or equipment.
Add insulation without losing access
Weatherstripping addresses air movement at the edge; insulation slows heat transfer through the panel itself. If the hatch is a flat, uninsulated board, a rigid insulation panel attached to its attic-facing side can improve its insulating value. The cover must remain secure when the hatch opens and must not make the panel too heavy or difficult to lift. Use compatible fasteners or adhesive according to the product instructions.
With pull-down stairs, an insulated, airtight cover or enclosure designed for attic stair openings may be a better option than trying to insulate the moving assembly directly. Measure carefully, confirm the cover fits the stair frame, and check that it can be removed or opened as intended. Keep the attic-side access clear enough for the stairs and hatch to operate.
Insulation is not a substitute for sealing the perimeter. Nor should an access cover be used to hide a roof leak, damaged framing or signs of moisture. If you find damp insulation, staining, mold-like growth or a musty smell, identify the moisture source before enclosing the area. Trapping moisture can contribute to building damage.
Keep the attic’s ventilation and safety intact
Attics may have intentional ventilation paths at the eaves, roof or gables. The hatch project should not block them. Do not push insulation into soffit vents or cover other ventilation openings to make the attic feel more airtight. The goal is to control air leakage between the home and attic while leaving the attic’s designed ventilation and required clearances undisturbed.
Extra caution is important in homes with fuel-burning appliances. Changes that make a home more airtight can affect how combustion appliances receive air and vent exhaust. If a furnace, boiler or water heater is nearby—or if you are unsure how it is vented—ask a qualified contractor to assess the situation before sealing. Never block an appliance’s combustion-air opening or a vent connector.
Check the result
After the work, close the hatch and check that it seals evenly, latches normally and opens without obstruction. Recheck the surrounding area for loose material and make sure nothing has been pushed into an attic vent. If the hatch is hard to operate, the gap is still uneven, or you discovered wiring, moisture or combustion equipment concerns, pause and get help.
Sealing an attic access is not a whole-home energy retrofit, and one small repair cannot solve every draft. But it is a practical way to address a specific opening—and a good reminder that air sealing and insulation do different jobs. A careful inspection, a suitable edge seal and an access cover that preserves safe operation can make this modest project more effective without turning a simple repair into a bigger problem.